 If you have problems with large tight rolls, there is a tool called the curling coach which is helpful, although with a little practice you can do them just using your fingers. I learned the technique of adding strips as I was rolling from Jane Jenkins. I was surprised at how easy it is. When I first started making large tight rolls, it was to make a chess set from a kit. This was probably 25 years ago. It was suggested to glue the strips end to end. I can’t even tell you how much harder that was. I would get six or seven strips rolled and somehow loosen my grip on the whole thing and end up with a twelve foot tendril! Try rolling that up again! Sliding the strips in as you roll makes the whole process so much easier and the resulting coil is nice and smooth, not lumpy.
Friday, December 18, 2009
Last Minute Quilling - Quilled Trinket Boxes
 If you have problems with large tight rolls, there is a tool called the curling coach which is helpful, although with a little practice you can do them just using your fingers. I learned the technique of adding strips as I was rolling from Jane Jenkins. I was surprised at how easy it is. When I first started making large tight rolls, it was to make a chess set from a kit. This was probably 25 years ago. It was suggested to glue the strips end to end. I can’t even tell you how much harder that was. I would get six or seven strips rolled and somehow loosen my grip on the whole thing and end up with a twelve foot tendril! Try rolling that up again! Sliding the strips in as you roll makes the whole process so much easier and the resulting coil is nice and smooth, not lumpy.
Thursday, December 10, 2009
Pat's Quilled 3D Christmas Tree & "Pattern"
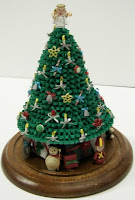
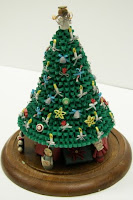
We’ve had a lot of inquiries lately about the quilled Christmas tree on the web site. The tree is at least 20 years old by now but always causes people to stop and look at it. I thought it was time for me to write down some general instructions for those of you who would like to make one. When I first started making Christmas trees the only green available was the bright Christmas green. I prefer a darker green, like a forest green or hunter green, but that is a matter of personal taste. Unfortunately, I can’t tell you how much paper you will need because it will be determined by the size of the tree and how loose (or tight) your quills are Just be sure you have plenty of green so all of your paper is from the same dye lot. (I actually spray painted one of my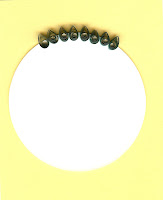 trees because the greens didn’t match. YUK!) The tree is very simple to make. I started with a 4” circle cut from card stock for the base; I would normally use a dark color for the base but have started one on a white base to make it easier to see. My first row of quills was 6” teardrops which I glued (pointy side out) around the circumference of the base. My next row was 3” tight rolls which are glued on top (toward the back) of the teardrops. The rest is easy . . . just keep alternating rows of
 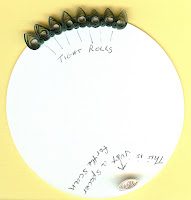 teardrops and tight rolls. Each row is glued farther back than the one before; the shape of the tree just comes naturally. You can make the tree in any size; mine are usually about 6” high. If you want a smaller tree, start with a smaller circle; for a larger tree use a bigger circle. The tree “trunk” is tight rolls (I use at four full strips to make them sturdy) stacked and glued together. You can make these with 3/8” strips so you don’t have to stack so many. Glue the “trunk” to the middle of the card stock base and then glue to whatever you are using for the base of the finished piece. (Mine is on a wood base that came with a glass dome.) I made my trunk about 1 ¾” high because I put little paper packages and quilled figures under the tree. The fun part is decorating the tree. I made lots of tiny bows from 1/16” wide paper. The candles are tight rolls made from ¼” paper strips about 1/12” long. Glue a bow to the
 candle base and put a 1” shaped teardrop for the flame. I use 12” strips to make little bells from silver paper (the new metallics are much prettier than what I used) and glue a bow to the top and a matching “clapper” inside. I also added some little yellow stars (using 5 one inch teardrops), Christmas balls (using 18” of paper is different colors), folded roses, and made red and white candy sticks by twisting the two colors into tendrils. This is my favorite type of tree, although I have also made some Victorian trees and decorated them with fans, hearts, roses, candles, and bells. Hmmm . . . maybe it’s time for new tree!
 trees because the greens didn’t match. YUK!) The tree is very simple to make. I started with a 4” circle cut from card stock for the base; I would normally use a dark color for the base but have started one on a white base to make it easier to see. My first row of quills was 6” teardrops which I glued (pointy side out) around the circumference of the base. My next row was 3” tight rolls which are glued on top (toward the back) of the teardrops. The rest is easy . . . just keep alternating rows of
  teardrops and tight rolls. Each row is glued farther back than the one before; the shape of the tree just comes naturally. You can make the tree in any size; mine are usually about 6” high. If you want a smaller tree, start with a smaller circle; for a larger tree use a bigger circle. The tree “trunk” is tight rolls (I use at four full strips to make them sturdy) stacked and glued together. You can make these with 3/8” strips so you don’t have to stack so many. Glue the “trunk” to the middle of the card stock base and then glue to whatever you are using for the base of the finished piece. (Mine is on a wood base that came with a glass dome.) I made my trunk about 1 ¾” high because I put little paper packages and quilled figures under the tree. The fun part is decorating the tree. I made lots of tiny bows from 1/16” wide paper. The candles are tight rolls made from ¼” paper strips about 1/12” long. Glue a bow to the
 candle base and put a 1” shaped teardrop for the flame. I use 12” strips to make little bells from silver paper (the new metallics are much prettier than what I used) and glue a bow to the top and a matching “clapper” inside. I also added some little yellow stars (using 5 one inch teardrops), Christmas balls (using 18” of paper is different colors), folded roses, and made red and white candy sticks by twisting the two colors into tendrils. This is my favorite type of tree, although I have also made some Victorian trees and decorated them with fans, hearts, roses, candles, and bells. Hmmm . . . maybe it’s time for new tree!
Subscribe to:
Posts (Atom)


