If you are a member of the North American Quilling Guild (NAQG), you have received information and registration forms for this year’s NAQGCON (The North American Quilling Guild Conference). This year the event will be held at the Sheraton Suites Tampa Airport on May1-3, 2009. This post is for those of you who may not have heard about the conference, or who may never have attended one. This annual tradition started more than 15 years ago, long before the NAQG was formed. It started with a small group of American quillers who found each other through membership in the English quilling guild. I was one of those members. I contacted the then 13 American members and began writing an informal newsletter, and that’s all it was, a newsletter to help us stay in touch. A small group of these American quillers attended the English Guild’s International Festival of Quilling and decided a year later to have a little reunion meeting here in the states. Although I didn’t go to England with the group, I did attend the “reunion meeting” the following year. We had lunch and a slide presentation, and then wandered around looking at each other’s work etc. I was blown away by the diversity of the work I saw, we discussed it and decided it should become an annual event, and it did.
A NAQG Conference is a very special event. In addition to getting an opportunity to meet other quillers from all over the world, you will able to see their work and learn and try new techniques. Quillers from around the United States and Canada are in attendance as well as quillers from Japan and often from England. You do not have to be a member of NAQG to attend, but once you meet all of these quillers, you will probably want to join. Just as an aside, we did decide to make our “informal” organization more formal and became the North American Quilling Guild in 2000. Our conference that year was in Nova Scotia, each year it is in a different location.
Over the years, the conference has grown from an afternoon event to a two and a half day conference. The general schedule of a NAQGCON goes something like this. Most people arrive sometime on Thursday, register and meet & greet old and new friends. Friday is a day of classes/workshops. During most of the conference there is an open “hospitality” room for quillers to visit and quill informally, or practice what they learned in the classes. In the last few years a competition is held for those who wish to compete. The competition pieces are put on display and the NAQG members vote to decide the winners in different categories. Only NAQG members are able to enter pieces in the competition, but they don’t have to attend in order to compete. Vendors usually set up their booths so they are available Friday night and all day Saturday. Quillers set up their individual displays on Saturday morning; the day is spent admiring all of the beautiful quilling, giving & attending demos, and having the public come in to view the beautiful art on display. The voting and announcement of competition winners also takes place on Saturday. Sunday brunch is followed by more open quilling and/or demos and then those quillers who are not extending their stay leave for home.
I encourage anyone who has even a passing interest in quilling to attend a NAQGCON, even if you can only get there for the public viewing hours. It is guaranteed to knock your socks off! For more information about joining the North American Quilling Guild and/or the NAQGCON check out the web site www.naqg.org or contact this years NAQGCON host Lois Bandt Weber Bladybugquill@wmconnect.com
Showing posts with label teaching quilling quilling resources. Show all posts
Showing posts with label teaching quilling quilling resources. Show all posts
Friday, January 9, 2009


Thursday, September 18, 2008
Sister Consolata & Quilling
Sister Consolata
I had a very good friend who used to tell me “What goes around, comes around”, I was never quite sure what he meant but have finally found an example which illustrates this point. As most of you know, anecdotal history tells us that quilling was “invented” by nuns centuries ago. The story as I heard it was that nuns cut off the gilded edges of old manuscripts to decorate religious artifacts. The result looked much like metal filigree. Recently, I was contacted by a nun, Sister Consolata, who asked for a catalogue of our products. I sent her our standard “info pack” which includes our order forms, color chart, samples of some of our specialty papers, and an informational letter which includes information about the quilling guilds (here in the USA and in England) and information about some of the online quilling groups. Several weeks later, I received a lovely typewritten letter from her; I would like to share some of it with you.
“Dear Miss Caputo,
While going over the material that was sent to me by Whimsiquills some time ago, I came across you very kind letter which was included with the material. I am very sorry that I somehow overlooked your letter when I first opened the envelope. Today, I determined to write to you.
I am a 94 year old Notre Dame Sister, and I have done quilling for about eight years. At one time I had some gift tags which were being sold in a shop here in Omaha. A dear lady was interested in them and obtained my address. Her name is Jan. She wrote to me and asked if I gave lessons on this craft. I wrote back and told her that I did not give lessons, but would teach her what I knew about quilling. I learned by using two books that a dear friend had given me.
So this lovely Jan came out to our convent and we became good friends. Jan far surpassed me in quilling. I told her “because of her nurse’s fingers,” you have become and expert in this craft. We had so many interesting times together and Jan gave me many materials to help me in my work. I am very sorry to tell you that lately Jan sent me, through a friend, much of her quilling paper. She has been very ill and cannot do any quilling.
However, I now have a little boy of Omaha, who is my new pupil. His grandparents, when touring our building, noticed me working on a quilled picture down in my art work room. They told me about their eleven year old grandson who is very talented in art and music. When they left our convent, these good people stopped at a craft store and purchased a book and some quilling tools. The next week, this dear grandmother brought young Spencer to me in order to learn about quilling. He is such a dear lad and I know he will do some beautiful work. In fact, I just learned that his teacher wants him to teach her to quill!!”
Her letter went on to tell me a little more about herself, she is a former teacher, and she “still make(s) many gift tags which sell well. I do tire easily so I cannot work as fast as I once did . . . but I want to keep on quilling as long as the Good Lord gives me the strength and ability to do so.” What a delight! Oh yes, she said in her letter that “I am the only nun in the community who does quilling . . .so far.
I had a very good friend who used to tell me “What goes around, comes around”, I was never quite sure what he meant but have finally found an example which illustrates this point. As most of you know, anecdotal history tells us that quilling was “invented” by nuns centuries ago. The story as I heard it was that nuns cut off the gilded edges of old manuscripts to decorate religious artifacts. The result looked much like metal filigree. Recently, I was contacted by a nun, Sister Consolata, who asked for a catalogue of our products. I sent her our standard “info pack” which includes our order forms, color chart, samples of some of our specialty papers, and an informational letter which includes information about the quilling guilds (here in the USA and in England) and information about some of the online quilling groups. Several weeks later, I received a lovely typewritten letter from her; I would like to share some of it with you.
“Dear Miss Caputo,
While going over the material that was sent to me by Whimsiquills some time ago, I came across you very kind letter which was included with the material. I am very sorry that I somehow overlooked your letter when I first opened the envelope. Today, I determined to write to you.
I am a 94 year old Notre Dame Sister, and I have done quilling for about eight years. At one time I had some gift tags which were being sold in a shop here in Omaha. A dear lady was interested in them and obtained my address. Her name is Jan. She wrote to me and asked if I gave lessons on this craft. I wrote back and told her that I did not give lessons, but would teach her what I knew about quilling. I learned by using two books that a dear friend had given me.
So this lovely Jan came out to our convent and we became good friends. Jan far surpassed me in quilling. I told her “because of her nurse’s fingers,” you have become and expert in this craft. We had so many interesting times together and Jan gave me many materials to help me in my work. I am very sorry to tell you that lately Jan sent me, through a friend, much of her quilling paper. She has been very ill and cannot do any quilling.
However, I now have a little boy of Omaha, who is my new pupil. His grandparents, when touring our building, noticed me working on a quilled picture down in my art work room. They told me about their eleven year old grandson who is very talented in art and music. When they left our convent, these good people stopped at a craft store and purchased a book and some quilling tools. The next week, this dear grandmother brought young Spencer to me in order to learn about quilling. He is such a dear lad and I know he will do some beautiful work. In fact, I just learned that his teacher wants him to teach her to quill!!”
Her letter went on to tell me a little more about herself, she is a former teacher, and she “still make(s) many gift tags which sell well. I do tire easily so I cannot work as fast as I once did . . . but I want to keep on quilling as long as the Good Lord gives me the strength and ability to do so.” What a delight! Oh yes, she said in her letter that “I am the only nun in the community who does quilling . . .so far.
Tuesday, April 15, 2008
Quilling & Home Schooling
Quilling & Home Schooling
I came upon a mention of quilling in a site recently and was surprised to learn that it was a site for home schooling. I was an "at home" mom during my children's early years and enjoyed all of the activities we shared together, but I can't imagine the energy and dedication it must take to home school them. It is obvious that our educational system in this country leaves something to be desired and that the needs of many young children are not being met: I guess that's why so many parents have decided to home school and why so many magnet schools are popping up. It is the exceptional teacher who can keep the subject matter fresh, new, and exciting. But I digress! I thought it was exciting to see quilling in a study unit, especially when so many art majors and teachers have never heard of it. I contacted Amy Pak http://www.msplinks.com/MDFodHRwOi8vd3d3LmhvbWVzY2hvb2xpbnRoZXdvb2RzLmNvbS8= and told her that I was a quiller, a member of the North American Quilling Guild, and how happy I was to see quilling included in the study program. I am always happy to see quilling being introduced to a new group of potential enthusiasts. I also told her about the blog and that we had free reference materials and patterns on our web site. Amy told me "We included quilling in the program as it was an art form that had carried over from Europe to the colonial era of America. It is important to us to share various forms of art for the children to try and experience!" Amy said she hadn't actually tried quilling until she did the Colonial Life unit, but she said "It was a joy to do!" She went on to say that her sons, 9 and 11 years old, enjoyed their quilling experience as well creating "scenes that were totally their own, by using the shapes to fit as they needed."
I took a few minutes to browse through some of the information on the Colonial Life unit and saw other "hands on" activities like punch tin, reverse painting, making a rope bed and straw tick. I thought back to when I was in high school; I hated history and didn't understand its significance. I took US history in summer school so I wouldn't have to sit through a whole school year of history classes. I probably would have felt differently had I had a more "hands on" experience and learned what life was really like in colonial America; I know I would have enjoyed learning about quilling. Let's see; I learned to quill when I was about 30, if I learned in school, just imagine how much more "stuff" I would have made by now!. It is certainly food for thought!
I took a few minutes to browse through some of the information on the Colonial Life unit and saw other "hands on" activities like punch tin, reverse painting, making a rope bed and straw tick. I thought back to when I was in high school; I hated history and didn't understand its significance. I took US history in summer school so I wouldn't have to sit through a whole school year of history classes. I probably would have felt differently had I had a more "hands on" experience and learned what life was really like in colonial America; I know I would have enjoyed learning about quilling. Let's see; I learned to quill when I was about 30, if I learned in school, just imagine how much more "stuff" I would have made by now!. It is certainly food for thought!
Monday, August 20, 2007
Quilling Calendar
Quilling Calendar
Today’s post is about a project you may or may not be aware of. In 2006, I was approached by Accord Calendar Company to coordinate a quilling-pattern-a-day calendar for the year 2007. Accord specializes in novelty calendars; they are actually more like kits than calendars. They make an origami calendar, an airplane calendar, a scrapbooking calendar, a watercolor calendar, a watercolor calendar and many more. The calendars come in patented gift boxes which open to form an easel stand. While the pages are dated, there is no room to jot down appointments or reminders. Instead each page has a picture of a small quilled item at the top of the page. The items are generally themed with the time of the year, for example: if you are looking for Halloween ideas just flip through until you get to the month of October. The bottom of the page is die cut into 18 six inch long quilling strips in the appropriate colors to complete the piece shown at the top of the page. The directions for making the piece are on the back of the picture. I had trouble visualizing this too, until I saw an mock up of the real thing. It is such a clever idea! The box includes a small slotted tool, a quilling shape key, and general instructions. Wow! Was I impressed!
The really neat thing about this project was the fact that quilling was finally being sold and seen someplace other than craft stores, (not that you see very much of it there either.) The calendars were sold in book stores, kiosks, craft stores, mail order, and by quilling suppliers; we sold more than 150 right here at Whimsiquills. We received terrific feedback from our customers. Teachers and scout leaders bought them as a teaching aid. Quillers bought them because they just wanted the 313 design patterns. Where can you get 313 designs for only $13.99? Why only 313 designs you ask? Well in order to be able to fit all of the pages in this neat little gift box, Saturdays and Sundays were combined on one page. Oh and where did the designs come from? From quillers of course! Each design had the creators name and web site (if there was one) printed on the page. North American Quilling Guild members created the designs for the first two calendars, (2007 and 2008). It was a challenge, because the quillers had to come up with designs that were approximately 2”x2” and didn’t use more than 108” of paper. You can’t even imagine the things they came up with! Since I was coordinating the project, all of the pieces came to me. What fun! It was like Christmas every day! I couldn’t wait for the mail to come to see what delightful surprises were in store.
Well, the 2008 calendar is finished and will soon be in stores, we are anxiously awaiting our shipment, but while we are waiting we are busy working on the 2009 calendar. (Talk about confusing, you can’t imagine what it is like working on a 2009 project in 2007! I have to double check every check I write because I keep writing 2009! . . . Talk about postdating a check!) One of the reasons I am doing this blog is to reach quillers who might not have known about this project and invite them to participate. If you are interested, contact me a Whimsiquills@cox.net or if you are in the USA or Canada you can call toll free 1 877 488 0894; if you are outside of the USA or Canada, our phone number is 1860 749 0894 and the fax is 860 763 3904. If you are interested in receiving the info packet via email or snail mail just let us know. We still have lots of days open for the 2009 calendar and would love to have you submit a design. We have a list of themes we are looking for and all of the general directions which we will be glad to send you. I’d like to get all of the submissions by the end of September.
Today’s post is about a project you may or may not be aware of. In 2006, I was approached by Accord Calendar Company to coordinate a quilling-pattern-a-day calendar for the year 2007. Accord specializes in novelty calendars; they are actually more like kits than calendars. They make an origami calendar, an airplane calendar, a scrapbooking calendar, a watercolor calendar, a watercolor calendar and many more. The calendars come in patented gift boxes which open to form an easel stand. While the pages are dated, there is no room to jot down appointments or reminders. Instead each page has a picture of a small quilled item at the top of the page. The items are generally themed with the time of the year, for example: if you are looking for Halloween ideas just flip through until you get to the month of October. The bottom of the page is die cut into 18 six inch long quilling strips in the appropriate colors to complete the piece shown at the top of the page. The directions for making the piece are on the back of the picture. I had trouble visualizing this too, until I saw an mock up of the real thing. It is such a clever idea! The box includes a small slotted tool, a quilling shape key, and general instructions. Wow! Was I impressed!
The really neat thing about this project was the fact that quilling was finally being sold and seen someplace other than craft stores, (not that you see very much of it there either.) The calendars were sold in book stores, kiosks, craft stores, mail order, and by quilling suppliers; we sold more than 150 right here at Whimsiquills. We received terrific feedback from our customers. Teachers and scout leaders bought them as a teaching aid. Quillers bought them because they just wanted the 313 design patterns. Where can you get 313 designs for only $13.99? Why only 313 designs you ask? Well in order to be able to fit all of the pages in this neat little gift box, Saturdays and Sundays were combined on one page. Oh and where did the designs come from? From quillers of course! Each design had the creators name and web site (if there was one) printed on the page. North American Quilling Guild members created the designs for the first two calendars, (2007 and 2008). It was a challenge, because the quillers had to come up with designs that were approximately 2”x2” and didn’t use more than 108” of paper. You can’t even imagine the things they came up with! Since I was coordinating the project, all of the pieces came to me. What fun! It was like Christmas every day! I couldn’t wait for the mail to come to see what delightful surprises were in store.
Well, the 2008 calendar is finished and will soon be in stores, we are anxiously awaiting our shipment, but while we are waiting we are busy working on the 2009 calendar. (Talk about confusing, you can’t imagine what it is like working on a 2009 project in 2007! I have to double check every check I write because I keep writing 2009! . . . Talk about postdating a check!) One of the reasons I am doing this blog is to reach quillers who might not have known about this project and invite them to participate. If you are interested, contact me a Whimsiquills@cox.net or if you are in the USA or Canada you can call toll free 1 877 488 0894; if you are outside of the USA or Canada, our phone number is 1860 749 0894 and the fax is 860 763 3904. If you are interested in receiving the info packet via email or snail mail just let us know. We still have lots of days open for the 2009 calendar and would love to have you submit a design. We have a list of themes we are looking for and all of the general directions which we will be glad to send you. I’d like to get all of the submissions by the end of September.
Tuesday, August 14, 2007
Quilling is it Art or Craft?
Quilling: Art or Craft
Many quillers struggle with the question as to whether quilling is an art or craft. My personal opinion is that it depends on the quiller and who the quiller is discussing the subject with. It has been my experience that many art "shows' don't have a quilling category simply because they have no idea what quilling is. How can they make a judgment that quilling is not an art when they really don't know anything about it? Sure quilling supplies may be purchased at craft stores, but oil paints and brushes are sold a craft stores as well; does that make oil painting a craft? I have seen quilling that is undoubtedly "art", in fact, a couple of pieces of my work are presently on tour with Exhibits USA, an art museum that puts together traveling exhibits. I have also seen quilling that would only fit into the "craft" category. To further illustrate my point: my painting ability could never be considered anything other than a "hobby/craft" and could never be mistaken for art, but that doesn't mean all painting would fall into that category; there are many outstanding artists who use paint as their medium and their work would never be considered anything but art. It definitely poses an interesting question. I recently read a post by Niki Abbott, a NAQG (North American Quilling Guild) member who was asked the same question, and with Niki's permission, I am reprinting her words and thoughts for your perusal. We would be interested in hearing your thoughts on this topic. Niki is a Canadian quiller who also sells quilling supplies Blueberry Lane Quilling I have included this link for the convenience of our Canadian quillers. She also writes a blog
Recently I was challenged with the question of whether quilling was an art or just a hobby craft. To be honest, I had not really considered it until now; I assumed anything a person made through their own innate creativity was art. I had quite a bit of difficulty answering this question, and I'm not entirely sure I've done so even now; but I have managed to dig up enough information to shed a bit of light on the subject.You can ask any serious quiller whether they believe their work is an art or a craft, and they will tell you that they wholeheartedly consider their work to be art - myself included.Unfortunately, quilling is considered a hobby craft in the art world, like scrapbooking and wood burning. This is because it is most commonly associated with scrapbooking and paper crafting.From an art critique's approach, although a quilling pattern may be original, the techniques and materials used nowadays are not. And in respect to that point of view, there is no real transformation of materials or unique signature of the person who created it. To put it bluntly, any two people can go out and purchase the same or similar materials, use the same pattern and produce nearly identical pieces. And that's why quilling falls through the cracks in the art gallery floor, so to speak.I know this point of view is highly argumentative, and I want to reassure you that I do not share this opinion on quilling - I believe each piece is unique in its own way and that quilling is an art form, albeit a lost one.I posed the question to the members of NAQG (North American Quilling Guild) and received some great responses and insight. I also contacted Mary Walker, a professional quiller in British Columbia, Canada, who had managed to convince her local art community to recognize quillwork as a true art form. She currently has many pieces on display in art galleries across Canada. According to Ms. Walker, who has done extensive research in her quest to revive the artistic side of quilling, it did actually start out as a craft. The common shapes used in quilling, marquises, pegs, teardrops, etc. are Egyptian in origin. Thirteenth century quilling extended from this craft, as Italian nuns began to create them with paper on a quill.Two centuries later, the nuns were melting silver or gold and covering the exposed surfaces of the paper, softening the edges. At this point in history, a name was chosen for this pastime and 'quilling' became recognized as an art. This was because by artists' own definitions, when you add a precious or semi precious metal to anything, you have created an art form.So, unless you soften the edges of your quillwork with gold or silver, it falls under the craft category. But if melting your own gold and silver is not an option for you, there is also a special paper available at quilling supply shops which already has the edges softened, thus giving the finish you need.Once you work is gilded, then and only then are you actually quilling - and creating art.
Thursday, July 26, 2007
Teaching/Learning Quilling Part #4 (Husking, Alternate Side Looping(ASL), Wheatears
Teaching Quilling-Part 4
Husking, Alternate Side Looping, Wheatears/Advanced

Oh! The wonderful things you can do with paper! In this class, I try to cover all of the things I didn’t cover in the first classes, easier said than done! This class covers husking, alternate side looping, wheatears, braiding, working with an onion holder (or comb), crimping and bandaging. I leave these topics for the last class making the assumption that by now, everyone is pretty comfortable working with those skinny little strips of paper and no longer feel like they are working with ten uncooperative thumbs! We have put some pictures up for you to refer to, a sampler with a braided basket, wheat ear and ASL (alternate side looping) flowers, alternate side looping designs in the corners (done with multiple color strips) and bandaging along the edge of the mat. We have also uploaded the instruction sheet I use as well as other example of husking etc.
 Wheatears- This is a really simple technique. You simply hold the end of a strip and make a loop (you can put a tiny dot of glue where the paper passes the end of the loop.) then you continue by making a larger loop around the first and so on. When you have made as many loops as desired, cut the end of the strip and glue the end down at the starting point. Wheatears can be used for many things, they make pretty flower petals, or leaves; they can be left rounded or pinched to a point. I like to make long looping wheatears for foliage, like daffodil or iris leaves, I pinch them and curve them so they look like the real thing. Wheatears can also be done with pins, like husking, just arrange the pins in a straight line. Read on . . .
 Husking-Husking is an interesting technique. Instead of rolling the paper, the paper is wrapped around pins on edge. I like to use some of the specialty papers for husking (graduated colors, two tones) because a husked piece is very open showing both sides of the strip. When I teach this class I give everyone a piece of Styrofoam, a piece of waxed paper, and a printed sheet with patterns marked out on graph like paper, and of course some pins. I start out by showing a couple of ways to get the paper started around pin #1, for me, this is always the tricky part. I show them how to wrap it around the pin several times or to make a tiny glued loop around the pin. Then we go through the steps of wrapping around pin #2, back to #1, around #3 back to #1 And so on. I tell them it is optional as to whether they want to put a dab of glue each time they get to #1, but they might want to the first time out. Once they have completed the shape, they have the option of wrapping the strip around the outside of the shape and gluing it back to the starting point. I tell them to twist the pins to remove them (just in case they got any glue on them) and then gently lift the finished piece off the waxed paper. Husking with pins has the advantage of making all of the shapes exactly the same size. With her boards there is no need for graph paper or drawing out designs. The metal pins are easily removed (they have no heads) and never “tip over” the way they do sometimes on a cork or Styrofoam board. You can see pictures of all of her boards on her web site (although she doesn’t sell retail) or on our web site Whimsiquills We also carry Quilled Creation’s Husking Hoops & Loops, pictured on our kits page. This kit supplies a small cork board, 6 different printed husking templates, paper and pins. I would suggest making copies of your templates and using the copies for your husking so your originals don’t get too dog eared. I’m assuming you are going to love husking and want to use your templates over and over.
 Alternate Side Looping-The best way I can describe this technique, is to call it husking without pins. Instead of using the board you actually hold the paper in your fingers . . . Make a loop, pass the paper under the starting pint and make a loop to one side of the center loop, pass it past the starting point and make a loop on the opposite side . . . hence the name, ASL. This is a little harder to describe without demonstrating, but there is an awesome book, “Quilling, Techniques and Inspiration” by Jane Jenkins (yes we carry it), which has great picture tutorials of all of these techniques (that’s how I learned them). I like to use the ASL technique using different color strips; instead of making the loop with one strip, I use two or three different colors, when you make the loops, pull the different color strips (just a little) so all of the colors show before gluing them.
 Braiding-Braiding is just what it sounds like, take three strips (I usually tape the ends together), and then start folding, right over center, left over center and flatten and just continue just as if you were braiding hair. The look will vary depending on what width strips you are using, and when you get comfortable you can try it with 5 strips. The basket in the sampler was braided and we’ve scanned in a couple of braids “in progress” for you to see. Of course you could weave strips to make your baskets, but I think braiding or “plaiting”, as they say across the pond, is more fun. There is another type of dimensional braid which is awesome. It is the trunk of the palm tree. I used four different colored strips for the trunk. I am not even going to try to explain it without demonstrating, but look in your copy of Malinda Johnston’s “Paper Quilling (Weekend Crafter)” on page 38 and 39 and you will see Bobbye Singer’s excellent directions along with pictures. I actually penciled in 1, 2, 3, and 4 on my strips so I wouldn’t loose my place if I got interrupted. What? You don’t own a copy? Call us; we’ll get one right out to you!
 Crimping-Crimping is a technique you see in a lot of antique quilling, except the early quillers didn’t have the neat little thingies we call crimpers. They made all of those tiny little folds by hand; can you imagine how long it took? You can tell they didn’t have TV back in the day! I didn’t want to break any copy write laws, by showing pictures from books, but if you have access to the Florian Papp Gallery catalogue you can see lots of crimping. Janet Wilson did a piece on page 4 of her book “The Craft of Quilling” in the style of antique quilling, you can get an idea of the way they used it. When I show how easy it is to crimp a strip with the Paplin crimper, everyone says “Well, what do you do with it?” Actually, I show a couple of crimping ideas in the flyer Paplin puts with the crimper. I like making the center of my sunflowers with a dark brown crimped strip; it kind of gives them a textured look. I also use crimped paper to make ferns in my wildflower pieces. Once again I will refer you Jane Jenkins book, “Quilling, Techniques and Inspiration” for lots of examples using crimping and there is a more recent book out by Molly Smith Christensen, “the new Paper Quilling” which has lots of crimping ideas, each one neater than the last. I LOVE her crimped watermelon and her crimped paisley mobile. Yeah! . . . We have this book too.
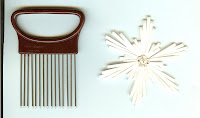 Onion Holder or Comb-This is not my favorite technique, although I do have to say I love the little angels everyone makes using the onion holder . . . I just don’t make them myself. We did put up a picture of a kind of snowflake I made using this technique and you can see pictures of the Quilled Creations combing kit most of us are using onion holders instead of combs, besides the combs don’t have as many tines. You can buy the quilling comb by itself or in the above mentioned kit or you may have an onion holder in your kitchen gadget drawer! Some still refer to this technique as combing even though they are using the onion holder. The paper is wrapped around the tines flat instead of on edge, a totally different look made with the same old strips. Two tones strips work really well on some of these designs. Not to confuse the issue, but you can also make wheatears on an onion holder.
 Bandaging-I was not familiar with this technique at all until some of my quilling friends came back from taking a master class at one of the English AGM’s. In this technique the strips are stacked to the desired thickness and then wrapped with a contrasting color. The sampler I keep mentioning (see top of page)has bandaging along the straight sides of the mat. I stacked dark blue, light blue and then dark blue strips and then wrapped them with a white strips. There is a great picture of bandaging in an antique piece on page 9 of Malinda Johnston’s “Book of Paper Quilling.” You will probably have to go to the library to see it as this book is now out of print.
As you can imagine I come to classes with armloads of books, samples, and quilling supplies in an effort to give as much information as I can cram into a session. I just realized as I was proofreading this, that somehow I turned all the pronouns around and it sounds like I am teaching you instead of trying to help you teach others. Oh well . . . I’m sure you got the gist. I hope it has been helpful . . . that’s all for now. Future topics include matting, framing, pricing, and quilling as a business . . . not necessarily in that order. Stay tuned . . .
Husking, Alternate Side Looping, Wheatears/Advanced

Oh! The wonderful things you can do with paper! In this class, I try to cover all of the things I didn’t cover in the first classes, easier said than done! This class covers husking, alternate side looping, wheatears, braiding, working with an onion holder (or comb), crimping and bandaging. I leave these topics for the last class making the assumption that by now, everyone is pretty comfortable working with those skinny little strips of paper and no longer feel like they are working with ten uncooperative thumbs! We have put some pictures up for you to refer to, a sampler with a braided basket, wheat ear and ASL (alternate side looping) flowers, alternate side looping designs in the corners (done with multiple color strips) and bandaging along the edge of the mat. We have also uploaded the instruction sheet I use as well as other example of husking etc.
 Wheatears- This is a really simple technique. You simply hold the end of a strip and make a loop (you can put a tiny dot of glue where the paper passes the end of the loop.) then you continue by making a larger loop around the first and so on. When you have made as many loops as desired, cut the end of the strip and glue the end down at the starting point. Wheatears can be used for many things, they make pretty flower petals, or leaves; they can be left rounded or pinched to a point. I like to make long looping wheatears for foliage, like daffodil or iris leaves, I pinch them and curve them so they look like the real thing. Wheatears can also be done with pins, like husking, just arrange the pins in a straight line. Read on . . .
 Husking-Husking is an interesting technique. Instead of rolling the paper, the paper is wrapped around pins on edge. I like to use some of the specialty papers for husking (graduated colors, two tones) because a husked piece is very open showing both sides of the strip. When I teach this class I give everyone a piece of Styrofoam, a piece of waxed paper, and a printed sheet with patterns marked out on graph like paper, and of course some pins. I start out by showing a couple of ways to get the paper started around pin #1, for me, this is always the tricky part. I show them how to wrap it around the pin several times or to make a tiny glued loop around the pin. Then we go through the steps of wrapping around pin #2, back to #1, around #3 back to #1 And so on. I tell them it is optional as to whether they want to put a dab of glue each time they get to #1, but they might want to the first time out. Once they have completed the shape, they have the option of wrapping the strip around the outside of the shape and gluing it back to the starting point. I tell them to twist the pins to remove them (just in case they got any glue on them) and then gently lift the finished piece off the waxed paper. Husking with pins has the advantage of making all of the shapes exactly the same size. With her boards there is no need for graph paper or drawing out designs. The metal pins are easily removed (they have no heads) and never “tip over” the way they do sometimes on a cork or Styrofoam board. You can see pictures of all of her boards on her web site (although she doesn’t sell retail) or on our web site Whimsiquills We also carry Quilled Creation’s Husking Hoops & Loops, pictured on our kits page. This kit supplies a small cork board, 6 different printed husking templates, paper and pins. I would suggest making copies of your templates and using the copies for your husking so your originals don’t get too dog eared. I’m assuming you are going to love husking and want to use your templates over and over.
 Alternate Side Looping-The best way I can describe this technique, is to call it husking without pins. Instead of using the board you actually hold the paper in your fingers . . . Make a loop, pass the paper under the starting pint and make a loop to one side of the center loop, pass it past the starting point and make a loop on the opposite side . . . hence the name, ASL. This is a little harder to describe without demonstrating, but there is an awesome book, “Quilling, Techniques and Inspiration” by Jane Jenkins (yes we carry it), which has great picture tutorials of all of these techniques (that’s how I learned them). I like to use the ASL technique using different color strips; instead of making the loop with one strip, I use two or three different colors, when you make the loops, pull the different color strips (just a little) so all of the colors show before gluing them.
 Braiding-Braiding is just what it sounds like, take three strips (I usually tape the ends together), and then start folding, right over center, left over center and flatten and just continue just as if you were braiding hair. The look will vary depending on what width strips you are using, and when you get comfortable you can try it with 5 strips. The basket in the sampler was braided and we’ve scanned in a couple of braids “in progress” for you to see. Of course you could weave strips to make your baskets, but I think braiding or “plaiting”, as they say across the pond, is more fun. There is another type of dimensional braid which is awesome. It is the trunk of the palm tree. I used four different colored strips for the trunk. I am not even going to try to explain it without demonstrating, but look in your copy of Malinda Johnston’s “Paper Quilling (Weekend Crafter)” on page 38 and 39 and you will see Bobbye Singer’s excellent directions along with pictures. I actually penciled in 1, 2, 3, and 4 on my strips so I wouldn’t loose my place if I got interrupted. What? You don’t own a copy? Call us; we’ll get one right out to you!
 Crimping-Crimping is a technique you see in a lot of antique quilling, except the early quillers didn’t have the neat little thingies we call crimpers. They made all of those tiny little folds by hand; can you imagine how long it took? You can tell they didn’t have TV back in the day! I didn’t want to break any copy write laws, by showing pictures from books, but if you have access to the Florian Papp Gallery catalogue you can see lots of crimping. Janet Wilson did a piece on page 4 of her book “The Craft of Quilling” in the style of antique quilling, you can get an idea of the way they used it. When I show how easy it is to crimp a strip with the Paplin crimper, everyone says “Well, what do you do with it?” Actually, I show a couple of crimping ideas in the flyer Paplin puts with the crimper. I like making the center of my sunflowers with a dark brown crimped strip; it kind of gives them a textured look. I also use crimped paper to make ferns in my wildflower pieces. Once again I will refer you Jane Jenkins book, “Quilling, Techniques and Inspiration” for lots of examples using crimping and there is a more recent book out by Molly Smith Christensen, “the new Paper Quilling” which has lots of crimping ideas, each one neater than the last. I LOVE her crimped watermelon and her crimped paisley mobile. Yeah! . . . We have this book too.
 Onion Holder or Comb-This is not my favorite technique, although I do have to say I love the little angels everyone makes using the onion holder . . . I just don’t make them myself. We did put up a picture of a kind of snowflake I made using this technique and you can see pictures of the Quilled Creations combing kit most of us are using onion holders instead of combs, besides the combs don’t have as many tines. You can buy the quilling comb by itself or in the above mentioned kit or you may have an onion holder in your kitchen gadget drawer! Some still refer to this technique as combing even though they are using the onion holder. The paper is wrapped around the tines flat instead of on edge, a totally different look made with the same old strips. Two tones strips work really well on some of these designs. Not to confuse the issue, but you can also make wheatears on an onion holder.
 Bandaging-I was not familiar with this technique at all until some of my quilling friends came back from taking a master class at one of the English AGM’s. In this technique the strips are stacked to the desired thickness and then wrapped with a contrasting color. The sampler I keep mentioning (see top of page)has bandaging along the straight sides of the mat. I stacked dark blue, light blue and then dark blue strips and then wrapped them with a white strips. There is a great picture of bandaging in an antique piece on page 9 of Malinda Johnston’s “Book of Paper Quilling.” You will probably have to go to the library to see it as this book is now out of print.
As you can imagine I come to classes with armloads of books, samples, and quilling supplies in an effort to give as much information as I can cram into a session. I just realized as I was proofreading this, that somehow I turned all the pronouns around and it sounds like I am teaching you instead of trying to help you teach others. Oh well . . . I’m sure you got the gist. I hope it has been helpful . . . that’s all for now. Future topics include matting, framing, pricing, and quilling as a business . . . not necessarily in that order. Stay tuned . . .
Tuesday, July 24, 2007
Teaching/Learning Quilling Part # 3 (Wide Quill & Dimensional Quilling)
Teaching Quilling-Part 3
Wide Quill and Dimensional Quilling
The second class I teach is using the wider papers, and some dimensional quilling basics. Each student gets a multi pack of ¼”, and 3/8’ papers. I ask them to bring their tools and 1/8” strips from the previous class. I begin with the wide quill roses, because that is such a popular flower. The rose seems to take more practice than any other flower I’ve taught so that is usually the one I start out with.
 Once again, in the interest of saving time, I precut the 3/8’ paper into the size pieces I use for roses. All of the quillers who take this class have already completed the basic class so they are pretty comfortable using the slotted tool,
 which is what I use to curl back the edges of each rose petal. When you look at the instruction sheet, you will notice that I do my rose centers a little differently than shown in most of the quilling books. (When I was taught
 to make roses, I was taught to put a loose coil in the center of the flower.) I like to continue making rose petals for the center by using ¼” hole punches. I fill the center of the flower with tacky glue and then stand the curled smaller petals (1/4” dots) up in the glue. I roll one dot into a tube and glue it shut for the very center of the rose. I also like to use several shades of the same color to make the roses more realistic. Ex: the first row of outside petals a very pale pink, the next row a little darker, and the center petals a darker shade. After the class members have completed their first rose, we move on to other flowers that can be created using ¼” and 3/8” papers. The class then learns how to “fringe” strips using scissors, and then how to combine different fringed strips to create an interesting variety of flowers. Once again, I “pre-fringe” some strips so students will have time to practice combining the different
 sizes.


FYI-in case you hadn’t noticed, we have some extremely talented people in the North American Quilling Guild (NAQG). If you haven’t already joined our ranks, you can join too.
Wide Quill and Dimensional Quilling
The second class I teach is using the wider papers, and some dimensional quilling basics. Each student gets a multi pack of ¼”, and 3/8’ papers. I ask them to bring their tools and 1/8” strips from the previous class. I begin with the wide quill roses, because that is such a popular flower. The rose seems to take more practice than any other flower I’ve taught so that is usually the one I start out with.
 Once again, in the interest of saving time, I precut the 3/8’ paper into the size pieces I use for roses. All of the quillers who take this class have already completed the basic class so they are pretty comfortable using the slotted tool,
 which is what I use to curl back the edges of each rose petal. When you look at the instruction sheet, you will notice that I do my rose centers a little differently than shown in most of the quilling books. (When I was taught
 to make roses, I was taught to put a loose coil in the center of the flower.) I like to continue making rose petals for the center by using ¼” hole punches. I fill the center of the flower with tacky glue and then stand the curled smaller petals (1/4” dots) up in the glue. I roll one dot into a tube and glue it shut for the very center of the rose. I also like to use several shades of the same color to make the roses more realistic. Ex: the first row of outside petals a very pale pink, the next row a little darker, and the center petals a darker shade. After the class members have completed their first rose, we move on to other flowers that can be created using ¼” and 3/8” papers. The class then learns how to “fringe” strips using scissors, and then how to combine different fringed strips to create an interesting variety of flowers. Once again, I “pre-fringe” some strips so students will have time to practice combining the different
 sizes.

I spend a little time in this class talking about dimensional quilling. This includes stacking or layering traditional shapes to create more of a 3-D effect and actually creating 3-D figures. Of course we cover the basics, learning to make tight rolls and then shaping them so they can be used to make tiny flower pots, or teddy bear bodies. I also show some outstanding examples of 3-D figures. I think Virginia Alexander’s (also a NAQG member) “Jinisans”are unsurpassed examples of quilled figures. Her book “Quilling in the Third Dimension” gives very detailed information about creating quilled figures . . . and yes we try to keep that one in stock as well. Examples of some 3-D quilling are shown in our gallery, I have a few of my dimensional pieces there, like the tea cup and the Christmas tree, and one of Sherry Rodehaver’s little tea cup critters, and be sure to look at the “Jinisans”, they are favorites of mine.
The last topic we cover in this class are some very basic “punch” flowers. While they are probably not considered to be quilling in a technical sense, punch flowers combine so well with quilling, that I like to include them in my classes. Again, I just cover some very basic ones to save time, I have some punched circles and hearts all ready for the class and then show them how to assemble them by using a tweezer to stand the petals up in a little dot of tacky glue, and then adding a quilled center. Sherry Rodehaver (yes she is also a NAQG member) has a great web site with lots of punches. If you enjoy playing with punch flowers, it is a must see. Here is a link to her site which we will also put on our resources folder.
The last topic we cover in this class are some very basic “punch” flowers. While they are probably not considered to be quilling in a technical sense, punch flowers combine so well with quilling, that I like to include them in my classes. Again, I just cover some very basic ones to save time, I have some punched circles and hearts all ready for the class and then show them how to assemble them by using a tweezer to stand the petals up in a little dot of tacky glue, and then adding a quilled center. Sherry Rodehaver (yes she is also a NAQG member) has a great web site with lots of punches. If you enjoy playing with punch flowers, it is a must see. Here is a link to her site which we will also put on our resources folder.
FYI-in case you hadn’t noticed, we have some extremely talented people in the North American Quilling Guild (NAQG). If you haven’t already joined our ranks, you can join too.
Wednesday, July 18, 2007
Teaching/Learning Quilling Part # 2 (Basic Shapes)
Teaching Quilling-Part 2
 Basic Shapes
I begin my first class by showing some borders and designs made with the basic shapes and I tell my students that by the end of this first class they will be able to create any one of the designs I show them. Of course, they don’t believe me. I then show them how to roll with a slotted tool, a needle tool, and finger rolling; I generally pre-cut some practice strips into two lengths, (3” and 6”) just to save time. Each student gets a package of mix/multi colored 1/8” strips and a slotted tool. I would ask my students to bring a small pair of sharp straight blade scissors and a pair of pointed tweezers from home. (I would always have extras on hand in case someone forgets to bring them) I didn’t require them to purchase a work board although I always had some of them on hand as well (especially since we sell all of the supplies), but for the class I would give each person a piece of Styrofoam covered with waxed paper, a damp paper towel, and a fine tipped glue bottle to use. Then they are ready to start.
The first thing I do is ask them all to take a 6” strip and insert it into the slotted tool and roll up the length of the strip. Then I tell them to let the coil fall off the tool into their hand, and to show me the loose coil. This is when I explain to them that different people will have different tension in their coils; just like two knitters can use the same weight yarn, the same size needles, yet one might knit very tightly and another very loosely. This usually helps them relax a little when they realize their coil doesn’t have to be exactly the same size as their neighbors. I go on to explain that the rolled coil is the basis for almost all of the shapes they will use in quilling.
I provide a shape chart for each participant; we go through how to make the various shapes and they can glue them right on a blank shape chart. I often suggest they make the shapes with the 3” and 6’ strips so they can see the difference in size. We have a shape chart for you here, feel free to download them and print them out if you are so inclined, I only ask that you leave the Whimsiquills info on them so people can find us. Although we sell kits and patterns here at Whimsiquills, I don’t use them while teaching. I explain the difference between kits and patterns and show them how to use a pattern, by placing it on a work board and covering it with waxed paper or Mylar. I explain how important it is to make sure the quills are glued to each other rather than the waxed paper, and how to gently remove the finished piece or section of a piece by slowly peeling the waxed paper off the back of the piece without “popping” any of the quills. After everyone has practiced the various shapes, I bring out the finished pieces I showed them at the beginning of the class. I then point out all of the shapes they have just learned in the borders and designs. They are always amazed at how simple the design really is when you break it down into the various shapes. I then give each student a card or piece of mat board and encourage them to create their own design. It is fascinating to see the variety of designs they come up with.
As I said earlier, this is just my technique; I try to encourage creativity but NOT giving them a specific design to copy. Some will go on to purchase kits and follow patterns, while others will just do their thing. I know some teachers who have ongoing classes where each person in the class quills the same design and the next time they meet they will quill another, this is a good way for quillers to stay in touch and helps maintain their interest. Somehow even though I have the same 24 hours in the day as everyone else, I just don’t seem to have enough time to do much teaching anymore. Whichever approach you take, there are now lots of materials out there to aid in your teaching, certainly a lot more than when I first learned to quill! We have some really neat beginner kits and teacher packages here at Whimsiquills.com which include papers, tools, designs, and some extras like shape charts, mat boards etc. I also show my beginner students my two favorite books “The Book of Paper Quilling” by Malinda Johnston (which is now out of print but available in libraries and probably on Amazon and “Paper Quilling for the first time” by Alli Bartkowski. Both have excellent tutorials, Malinda’s book has lots of neat projects from different quillers (including a couple of mine) and a really neat gallery, and Alli’s book goes into great detail on 14 different techniques and also includes some projects and a gallery. We always have both books in stock since they are two of my favorites. Another book which is actually like a starter kit is “Twirled Paper” by Jacqueline Lee. This book comes with a tool, a package of paper, and glue. It is chock full of really cute ideas for the younger set including bugs, animals and aliens. It is a great gift idea for a child who likes to work with his hands and a great way to get our next generation of quillers started.
Stay tuned for part 3 which will be wide quill paper and dimensional quilling.
I begin my first class by showing some borders and designs made with the basic shapes and I tell my students that by the end of this first class they will be able to create any one of the designs I show them. Of course, they don’t believe me. I then show them how to roll with a slotted tool, a needle tool, and finger rolling; I generally pre-cut some practice strips into two lengths, (3” and 6”) just to save time. Each student gets a package of mix/multi colored 1/8” strips and a slotted tool. I would ask my students to bring a small pair of sharp straight blade scissors and a pair of pointed tweezers from home. (I would always have extras on hand in case someone forgets to bring them) I didn’t require them to purchase a work board although I always had some of them on hand as well (especially since we sell all of the supplies), but for the class I would give each person a piece of Styrofoam covered with waxed paper, a damp paper towel, and a fine tipped glue bottle to use. Then they are ready to start.
The first thing I do is ask them all to take a 6” strip and insert it into the slotted tool and roll up the length of the strip. Then I tell them to let the coil fall off the tool into their hand, and to show me the loose coil. This is when I explain to them that different people will have different tension in their coils; just like two knitters can use the same weight yarn, the same size needles, yet one might knit very tightly and another very loosely. This usually helps them relax a little when they realize their coil doesn’t have to be exactly the same size as their neighbors. I go on to explain that the rolled coil is the basis for almost all of the shapes they will use in quilling.
I provide a shape chart for each participant; we go through how to make the various shapes and they can glue them right on a blank shape chart. I often suggest they make the shapes with the 3” and 6’ strips so they can see the difference in size. We have a shape chart for you here, feel free to download them and print them out if you are so inclined, I only ask that you leave the Whimsiquills info on them so people can find us. Although we sell kits and patterns here at Whimsiquills, I don’t use them while teaching. I explain the difference between kits and patterns and show them how to use a pattern, by placing it on a work board and covering it with waxed paper or Mylar. I explain how important it is to make sure the quills are glued to each other rather than the waxed paper, and how to gently remove the finished piece or section of a piece by slowly peeling the waxed paper off the back of the piece without “popping” any of the quills. After everyone has practiced the various shapes, I bring out the finished pieces I showed them at the beginning of the class. I then point out all of the shapes they have just learned in the borders and designs. They are always amazed at how simple the design really is when you break it down into the various shapes. I then give each student a card or piece of mat board and encourage them to create their own design. It is fascinating to see the variety of designs they come up with.
As I said earlier, this is just my technique; I try to encourage creativity but NOT giving them a specific design to copy. Some will go on to purchase kits and follow patterns, while others will just do their thing. I know some teachers who have ongoing classes where each person in the class quills the same design and the next time they meet they will quill another, this is a good way for quillers to stay in touch and helps maintain their interest. Somehow even though I have the same 24 hours in the day as everyone else, I just don’t seem to have enough time to do much teaching anymore. Whichever approach you take, there are now lots of materials out there to aid in your teaching, certainly a lot more than when I first learned to quill! We have some really neat beginner kits and teacher packages here at Whimsiquills.com which include papers, tools, designs, and some extras like shape charts, mat boards etc. I also show my beginner students my two favorite books “The Book of Paper Quilling” by Malinda Johnston (which is now out of print but available in libraries and probably on Amazon and “Paper Quilling for the first time” by Alli Bartkowski. Both have excellent tutorials, Malinda’s book has lots of neat projects from different quillers (including a couple of mine) and a really neat gallery, and Alli’s book goes into great detail on 14 different techniques and also includes some projects and a gallery. We always have both books in stock since they are two of my favorites. Another book which is actually like a starter kit is “Twirled Paper” by Jacqueline Lee. This book comes with a tool, a package of paper, and glue. It is chock full of really cute ideas for the younger set including bugs, animals and aliens. It is a great gift idea for a child who likes to work with his hands and a great way to get our next generation of quillers started.
Stay tuned for part 3 which will be wide quill paper and dimensional quilling.
Monday, July 16, 2007
Teaching/Learning Quilling Part # 1
Teaching Quilling-Part 1
This will be a four part series since there is way too much information to put in one post. There are many different approaches to teaching; I’m going to cover a few of them and would very much be interested in hearing from others who have taught. Lots of questions come up about teaching quilling, especially for first timers. Hopefully this will give you some “food for thought”.
Your approach may differ depending on whether you are teaching in your home, a community center, or a store. Time, space, and fees will all play a part in setting up a class plan. If you are teaching in your home, you will probably be supplying everything your students need to take a class. I usually included a package of mixed/multi colored 1/8” strips and a slotted tool in the cost of the class. I would ask my students to bring a small pair of sharp straight blade scissors and a pair of pointed tweezers from home. (I would always have extras on hand in case someone forgets to bring them) I didn’t require them to purchase a work board although I always had some of them on hand as well (especially since we sell all of the supplies), but for the class I would give each person a piece of Styrofoam covered with waxed paper, a damp paper towel, and a fine tipped glue bottle to use. (When I first started teaching we didn’t have those wonderful little bottles so I would squirt a little white glue on a piece of waxed paper and supply a toothpick; I definitely like the glue bottle better. Nobody gets their elbow stuck in the glue while reaching over for scissors etc.)
When I teach, I like to have a small group of 6-10 people. That way I can get them all around a couple of small tables and really give each person my undivided attention. Although, I have to tell you, I once taught a group of 20+ sorority members aged 23-83 years old. (One of them had seen quilling and decided they should all learn to make quilled favors for a national sorority reunion).This was done in a private home. None of the rooms were large enough to accommodate the whole group so tables were set up in two different rooms. Of course I had to do everything twice because the “students” in one room couldn’t see or hear what was going on in the other room. I spent the whole evening running back and forth between the two rooms. (too bad this was before roller blades and wheelies). The crazy part was when the two groups decided it was a competition and would try to see which group could complete the next step first. What a crazy night! That night I felt like I had run a marathon.
If you are teaching in a store, class fees may be determined by the store and usually the store wants the students to buy their supplies at the store. Of course we all know how rare it is to find a store that has a “good” selection of quilling supplies. It gets a little tricky when the store has only minimal supplies; you may find yourself providing supplies from your own private stash. The time factor also comes into play, I like having about three hours for a class, I was never allowed to use that much time in a store setting so I had to adjust my “lesson plan” accordingly. I generally run a series of three classes: Basic shapes/beginners, Wide quill/intermediate and Husking/alternate side looping wheatears/advanced. Stay tuned . . . my next post will be Part 2 –Basic shapes.
This will be a four part series since there is way too much information to put in one post. There are many different approaches to teaching; I’m going to cover a few of them and would very much be interested in hearing from others who have taught. Lots of questions come up about teaching quilling, especially for first timers. Hopefully this will give you some “food for thought”.
Your approach may differ depending on whether you are teaching in your home, a community center, or a store. Time, space, and fees will all play a part in setting up a class plan. If you are teaching in your home, you will probably be supplying everything your students need to take a class. I usually included a package of mixed/multi colored 1/8” strips and a slotted tool in the cost of the class. I would ask my students to bring a small pair of sharp straight blade scissors and a pair of pointed tweezers from home. (I would always have extras on hand in case someone forgets to bring them) I didn’t require them to purchase a work board although I always had some of them on hand as well (especially since we sell all of the supplies), but for the class I would give each person a piece of Styrofoam covered with waxed paper, a damp paper towel, and a fine tipped glue bottle to use. (When I first started teaching we didn’t have those wonderful little bottles so I would squirt a little white glue on a piece of waxed paper and supply a toothpick; I definitely like the glue bottle better. Nobody gets their elbow stuck in the glue while reaching over for scissors etc.)
When I teach, I like to have a small group of 6-10 people. That way I can get them all around a couple of small tables and really give each person my undivided attention. Although, I have to tell you, I once taught a group of 20+ sorority members aged 23-83 years old. (One of them had seen quilling and decided they should all learn to make quilled favors for a national sorority reunion).This was done in a private home. None of the rooms were large enough to accommodate the whole group so tables were set up in two different rooms. Of course I had to do everything twice because the “students” in one room couldn’t see or hear what was going on in the other room. I spent the whole evening running back and forth between the two rooms. (too bad this was before roller blades and wheelies). The crazy part was when the two groups decided it was a competition and would try to see which group could complete the next step first. What a crazy night! That night I felt like I had run a marathon.
If you are teaching in a store, class fees may be determined by the store and usually the store wants the students to buy their supplies at the store. Of course we all know how rare it is to find a store that has a “good” selection of quilling supplies. It gets a little tricky when the store has only minimal supplies; you may find yourself providing supplies from your own private stash. The time factor also comes into play, I like having about three hours for a class, I was never allowed to use that much time in a store setting so I had to adjust my “lesson plan” accordingly. I generally run a series of three classes: Basic shapes/beginners, Wide quill/intermediate and Husking/alternate side looping wheatears/advanced. Stay tuned . . . my next post will be Part 2 –Basic shapes.
Subscribe to:
Posts (Atom)


 Posts

